|

Instructions for Using DQCThe Digital Quaker Collection web site is the gateway to the digital library of Quaker works consisting primarily of the 17th & 18th centuries. The Home page displays a prominent button that reads "Enter." Pressing this button will bring you to a choice to "Search Collection" or "Browse Collection." Pressing either button begins a session in the program. You may see the term "login", but it does not mean that you need to have a login ID. The session begins automatically and a "cookie" is placed in your browser's cookie folder. The software does nothing else with the cookie than indicate a session and the cookie expires when the session ends. An inactive session will eventually result in the software logging you out. 
Throughout the session you will have a fixed set of navigational buttons on the left side. The Search button will bring you to the Search page where you will have several different types of searches to choose from. The View Results List is a way to return to your most recent search results. Browse Titles allows you to locate texts when you already know the title of the work. Browse Authors helps you locate texts based on the author's name. Search History gives you a list of searches you've performed within your current session. Log Out is the best way to exit DQC so that the search engine frees up resources from your session; otherwise it waits until the session times out. Browse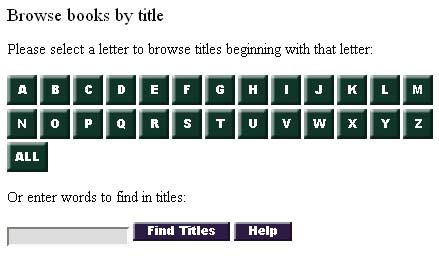
One of the most basic functions is to locate a text. Because DQC was designed primarily as a tool for academic research and a database for studying and analyzing the texts, browsing and reading texts is an online activity. Rather than locating a document for the purpose of download, you will need to remain online to use DQC. The end result of browsing is to locate a text to read online either as a Digital Page or as a Page Image. DQC maintains the concept of reading a book page by page (even keeping line breaks) so that DQC works are an electronic instance of the book rather than a new electronic edition. Locate the work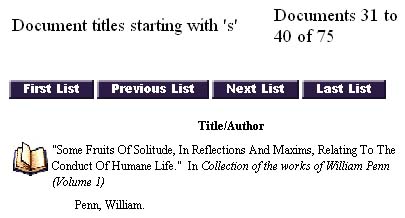
If you have an idea of the title of a work but not necessarily the author, use the Browse Titles. You can locate the title either by clicking a letter in the alphabetical buttons or entering words from the title in the Find Titles search box. The Document Titles screen will list ten works at a time that meet the criteria of your search for a work and provide you with a way to navigate the list of works. Example : You remember a work by the name of "Some Fruits of Solitude." If you click the "S" button, you will get a list ten at a time of 75 works that begin with "S." If you entered title words in the Find Titles search box like "fruits solitude," you will get a shorter listing of works. The word "solitude" in that Find Titles search box will actually open that work since it is the only work with the word "solitude" in the title. You navigate between lists of ten with the Previous List and Next List. You can jump to the beginning or the end of the list with the First List and Last List buttons. Click on the book icon to begin browsing that work. Note : Notice that book titles appear in italic. When those books are collections of individual works, the works are normally categorized individually and the titles appear in quotation marks. Multivolume works include the volume number. You are also able to locate the collected work or volumes of a multivolume work or collection of works. 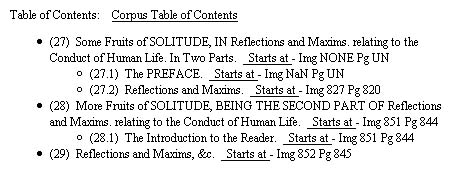
The Table of Contents page is the beginning point for browsing a work. At any time when you are within a work you can go to the Table of Contents page. If the work is part of a collection of works, you can click the link to move up to the Corpus Table of Contents (in this example you would see the contents of volume one of Collection of the Works of William Penn). The Table of Contents displays the structure of the work as well as indicate the pagination (e.g., Pg 820; page numbers correlate with the printed edition). The Image number (e.g., Img 827) is the number of the scanned images of the pages in the book. You can enter a work at the start of any section with the link Starts at. Click that link and you will enter the work at that point. At the top of the Table of Contents page is a button Return to Titles List or Return to Authors List depending on how you arrived at the work. Pressing that button will return you to your list of works. Digital Page Display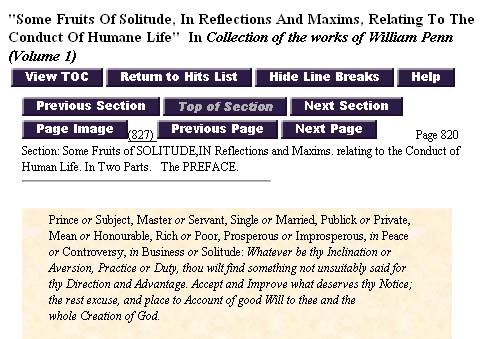
At the right is an example of viewing the digital page (text view as opposed to an image view). At the top of the page is the basic information about the work. The first row of buttons contains actions that take the user from the page or control the display of the page. View TOC takes you to the electronic Table of Contents page. The Return to Hits List displays when you have arrived at a page as the result of searching for text. Clicking that button will take you back to your Hits List page. An important button is the Hide Line Breaks (toggles to Show Line Breaks). By default the display of the digital page shows the line breaks as they occur in the printed edition. This makes it easier to switch back and forth from the Page Image view and locate a place within the text. There are two benefits to hiding the line breaks. Without the line breaks you will see the text flow on the screen better--wide monitors will show more text horizontally and take up less space vertically; small monitors won't show lines wrapping and then breaking half-way on the next line, for instance. The most important benefit is when you want to select some text, copy it, and paste it into another program like a word processor. With the line breaks turned on, you would have line breaks in the selection and most likely need to remove them. Therefore, if you desire to copy and paste text you will want to hide the line breaks. The next rows of buttons are navigation buttons. The first row of horizontal navigation buttons are designed to help you move from section to section within the structure of the work. As with all buttons, when the button is inactive it is grayed out (e.g., the above page is the top of the section, so the Top of Section button is grayed out). The Previous Section takes you backwards (or up the hierarchy) in the document to the beginning of the previous section. The Next Section puts you at the beginning of the next section. The bottom row of buttons at the top of the page are the page level buttons. The Page Image button displays a scanned image of the page (see below for a description of the Page Image view). The Previous Page and Next Page buttons allow you to navigate from page to page. Next to the Next Page button is the actual page number in the book of the page being displayed. The running head of the book pages are not included in the text view, but the page number is shown (or UN if the page is unnumbered in the book) and the section heading is displayed above the page area. The page area of the text view is displayed within the area with the parchment background. There are only a few page features displayed in the text. Some character formatting (italic, for instance) is displayed along with basic paragraph formatting (headings, paragraphs, block quotes, lists). Some pages have margin text, which DQC displays as inset boxes. Most of the buttons and information from the top of the page are duplicated at the bottom of the page so that you don't need to scroll back up in order to navigate the pages. Page Image Display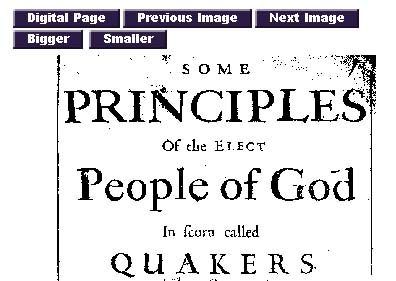
Clicking the Page Image button displays the scanned image of the page. There are several reasons why you might want to do that. One reason is for the aesthetics of seeing the way 17th century works looked when printed. A more important reason may be when the typeface of some works were too difficult for they keyers to recognize with 100% confidence and they used a hyphen rather than guess at the character (these instances are tagged in the underlying XML code as <unclear>). If you come across a case like that, you might want to look at the original page to see if you can discern what the character was. Another reason for looking at the page is when a page has a complex layout (marginalia, tables, insets, footnotes, photos, etc.). The Digital Page button will return you to the text view. The Previous Image and Next Image buttons allow you to navigate from page to page. The Bigger and Smaller buttons enlarge and shrink the view of the image. Since the page image is 150dpi, you should be able to enlarge the image to twice the size without loss of quality. Once the size is set, that size is maintained throughout the session for other page images. As explained in the FAQ, there are instances when users (typically with Internet Explorer) have not seen a page image. That can be corrected by logging out of DQC, clearing the browser's cache and cookies, then enter DQC again. Search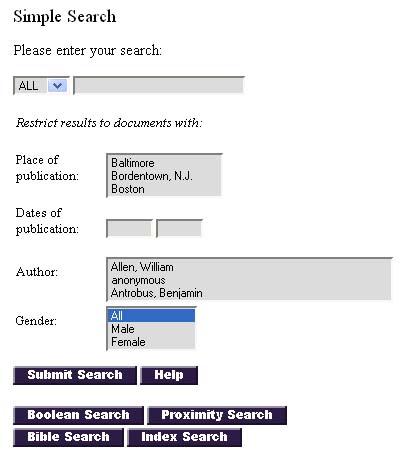
The other major function of DQC is to locate texts and specific contexts in which a word or words are used. You would click the button on the left to begin a search. Normally this takes you to the Simple Search screen. Then you would choose the type of search you wish to perform by clicking the buttons at the bottom of the search interface--if you wish to perform a different type than Simple.
Search FeaturesThe various search screens have some similar features. After you choose the type of search, you enter the search terms into the fields and then can set several types of restrictions based on place & date of publication, author(s), or gender of authors. All or AnyThe Simple Search, for instance, allows you to enter multiple search terms and choose "all" or "any" based on the type of search (you might just be searching for a single term). You might, for example, enter terms peace justice and select ALL. The results would give you places in documents in which all the terms occur ranked in order of how closely they match the search. You might use ANY when you have a string of synonyms, for example: supper communion. PhrasesYou enclose a phrase in quotation marks to search for a phrase. One example might be a search for a Quaker expression: put the words in quotes "inward seed" to search for that phrase. Or you might look for where a biblical expression is used, for example: "wars and fightings". Wildcard OperatorsWildcard characters (* ?) help you to search for variations in a word, such as a word with different word endings or forms. The asterisk is a wildcard character that substitutes for multiple characters. For example, you want to find places where forms of the word "peace" occur, but you know there are several forms. So you enter peace* as your search term. You will then find these terms: peace peace's peace.1 peace.9 peace.a peace.b peacea peaceable peaceableness peaceablenesse peaceablest peaceably peacebly peacebreakers peacefnl peacefu peaceful peacefully peacefulness peacemaker peacemakers peacemeal peaces. The question mark substitutes for a single character. For example, you are interested in reading about James Naylor, but you know there is a variant in the spelling of his last name. A search for Nayl?r will locate Naylor and Nayler. Search Restriction FieldsYou can restrict the results of your search, if you know that you are looking for something very specific. Most often that would be related to authorship, but some other fields are also available. The Place of Publication and Date of Publication may not be very helpful for most types of searches. This is based on the metadata for the edition of the book used for DQC. The metadata for DQC works does not include information about when and where a work was first published. Perhaps this information will be included in the future. The Author restriction is a field in which author(s) can be selected. Author names in the list do not need to appear together to be selected. For a single author, scroll through the list and click the name. You can also go through the list by first clicking on any name in the field and then press the first letter of the last name. Pressing that letter on your keyboard will move through the choices of names which begin with that letter. You can select contiguous names by selecting the first author name, scroll to the last author name you wish to choose, and then hold the shift key and select the last author name in your list. You can select noncontiguous names by holding down the control key and then selecting multiple authors. You might be interested in searching for a term and seeing only the results in works written by women. You can choose Female in the Gender restriction field. Search Results DisplayBefore describing each of the types of searches, we will first look at the types of screens you will see as the result of any of the types of searches. The first type of screen you will see is a Document List. These are works in which your search term(s) occur(s); you move forward and backward in the list. Clicking on the book icon will "drill down" to see the Hit List, which contains the listing of the hits within that work. Again, you can move forward and backward in the listing of the hits (while in the Hit List view, you can also move forward and backward in which document for which you are viewing the Hit List or choose View Results List to go back up to view the list of documents). You will then "drill down" further when you choose View Page (or Expand Context) and look at the page of the work containing your search term(s). Document List
After you search for a term(s) you will see the result in a document list. The document list contains a list of the documents which contain your search terms). The book icon next to the works is the indication that you are looking at a list of documents. The top of the page shows the number of your query and indicates that you are looking at the first ten documents of 271. You can change the number of documents you view at one time by choosing the number of Titles per Page (5, 10, 25, 50, 100, ALL) and then clicking Set. This option is only available when you first view a document list. Once it is set, it will remain set to that amount for the rest of your session. You can navigate from page to page of your document list by pressing a button in the button list. Next List and Previous List move a page of documents at a time. You can jump to the beginning and to the end with the First List and Last List buttons. To view the results within a document, click the book icon. You will be able to return to this level by clicking the View Results List. You will also be able to move through the document list by clicking the "Doc" buttons in the Hit List view. Hit List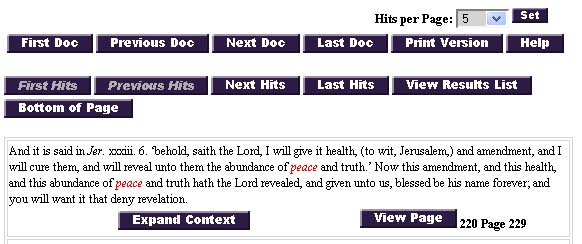
The Hit List view is the result of choosing a work within the Document List view after having performed a search. It shows the list of "hits" within a single document. The information at the top of the Hit List helps you to know what the document is (short title, author, date, and number of pages), how many documents are in your result and how many hits are in the document you've selected. You are able to set the number of Hits per Page by choosing the number (5, 10, 25, 50, 100) you want and pressing the Set button. This option appears only when you first view the Hit List. The top set of buttons are "Doc" buttons. Clicking one of these buttons moves from the current document to another document. The second row of buttons help you navigate the hit list. You can return to the Document List view by pressing the View Results List button. The Print Version button will open a new browser window with a "printer friendly" layout. That page only displays the number of hits per page you have set. If you set that number to a high amount and print that page, you might want then to study that listing "offline" and decide which texts require further study. Even if you get all the results for one document printed, you would need to do the same process for every document in order to get a complete analysis. People who can't or don't like to remain online can use this feature. However, DQC is designed for analysis of texts online. The Bottom of Page and Top of Page (at the bottom of the screen) buttons are there so you can jump to the top or the bottom of the Hit List screen. Each hit is shown within a context of a paragraph. Sometimes this is a few lines and other times it can be a rather large number of lines of context. Normally you will see the search terms highlighted in red (that's not the case for the Bible Search). Each hit with its paragraph of context is followed by two buttons: Expand Context and View Page . Typically you will want to choose the View Page button. Notice that next to that button is an indication of the image number and the page number. 
The Expand Context button shows the Expanded Hit Display. This display shows you the entire section of the document in which that hit occurs with your search term(s) highlighted in red. The Zoom Out and Zoom In buttons control how much of the document you see. Zoom Out expands the amount of context to include other sections. Ultimately the Zoom Out button will expand the context to include the entire work. Hint: If for some reason you want to have an entire work, you can use this feature to expand the context and then copy & paste the whole work into a word processor. Nothing prevents you from doing that and we would not consider it stealing our data, as long as it is for personal use. Click the Return to Hits List button to go back to the Hit List view. The other way to view a "hit" is the View Page button. This view has been described above as the Digital Page. Types of searchesThe type of search will depend on the nature of your study. If you are studying a word (e.g., sanctification) or a phrase (e.g., "that of God"), you would normally use the Simple Search. If you are studying a broader concept (e.g., salvation language, use of sacraments, peace testimony, silent meetings), you would use the Boolean or Proximity searches. It's helpful to think of the difference between Boolean and Proximity as the former "locates texts" and the latter "locates contexts." To further refine your search you might need to use the Index Search. The Bible search will be used to locate the places where a Bible text is explicitly cited. SimpleThe features of the Simple search have been described above. Boolean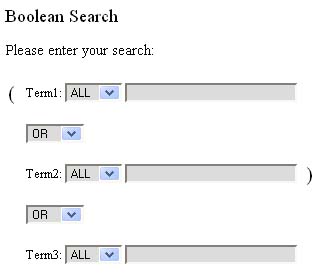
Boolean searches are a typical feature of search programs. The parentheses indicate the search order. The first two expressions are performed and then the third is performed in relationship to the first set. Each set of terms can be designated as ALL or ANY. The search would follow this pattern: Search (ALL/ANY term(s)1 OR/AND/NOT ALL/ANY term(s)2) then OR/AND/NOT ALL/ANY term(s)3. Example: Search for ANY of the terms inward inner AND ANY of the terms outward outer, AND ANY of the terms nature spirit life. Remember that you are locating texts with a boolean search. The results will show you what texts contain this concept. Proximity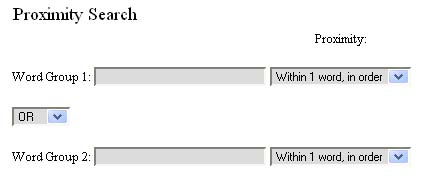
A proximity search also helps you to locate concepts, but a proximity search locates a concept within a close context in a document. Enter the words in the same field you want to locate within the designated range of each other. You can combine that search in a boolean expression with another proximity search by entering the second group of words in the second field. Note: The first choice "Within 1 word, in order" is the same as conducting a phrase search in the Simple Search screen. The other settings for proximity range get progressively more difficult for the search program. The search may appear to be performed quickly, but the results may take time to be displayed when you click on the book icon in the Document List. A proximity range of 10 or 15 words will take longer and some searches may not return results. Example: Enter peace war and choose a proximity of 5 words. Here is an example of a hit in a work of William Penn. The Rich draw in their Stock, the Poor turn Soldiers, or Thieves, or Starve: No Industry, no Building, no Manufactury, little Hospitality or Charity; but what the Peace gave, the War devours. I need say no more upon this Head, when the Advantages of Peace , and Mischiefs of War are so many and sensible to every Capacity under all Governments, as either of them prevails. 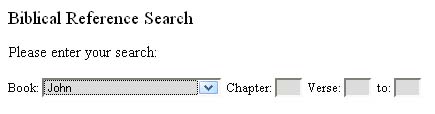
Bible SearchThe Bible Search is a search of the explicit citations of the Bible (and some extra-biblical books). These citations were encoded in the XML documents and demonstrate the power of XML with an XML search engine. A search for a Book will locate all citations to that book. A search for a Book and a Chapter will locate all citations of verses within that chapter. The search becomes more specific with a single verse search or range of verses. The Hit List for this type of search will not have the citation highlighted. Index Search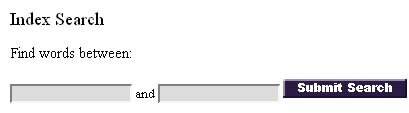
The Index Search is a way to access the full list of words in DQC. This type of search is helpful if you are not sure of all the permutations and variations your search term might have, either because of grammatical forms or because of spelling variations. 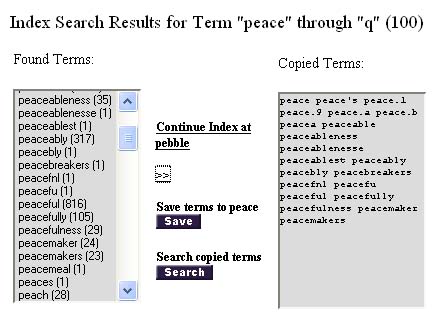
You begin by entering a word in the first field. This alone will return an Index Search Result showing the next 100 words after that word. You can enter a second word if you want to limit the number of words in the Index Search Result. If the number of words in between the two words is greater than 100, you will only see the first 100 words. Notice that the result list tells you how many times that word occurs in the DQC database. Select the word(s) from the Found Terms field. Remember that you can choose multiple words which are contiguous (shift-click) or non-contiguous (control-click). Click the symbol >> to transfer those terms to the Copied Terms field. At any time you can click the Save button to store those copied terms to memory. Pressing the Search button or the Submit Search button at the bottom of the screen will perform the search. 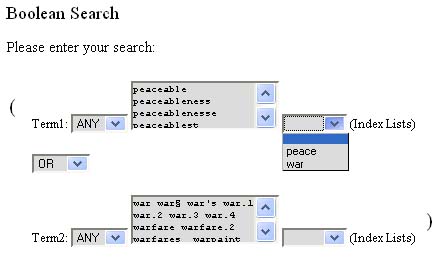
If you saved the results of search, you are able to use that list of words in the Boolean Search screen. For example, you save a list of words for peace and then do the same thing with terms for war. To get the list for war requires using the Continue link to get several more lists of 100 words. When you have those words, you can click the Search button on the main navigation bar on the left. Then select Boolean Search from the bottom row of buttons. You will now see that the Index Lists are available. Selecting one from the Index List will put the terms into the search field. |